Two Player Arcade1Up Conversion Kit (Laser Cut)
The file 'Two Player Arcade1Up Conversion Kit (Laser Cut)' is (pdf,svg) file type, size is 211.4KB.
The file 'Two Player Arcade1Up Conversion Kit (Laser Cut)' is (pdf,svg) file type, size is 211.4KB.
This is a collection of several parts designed to convert an Arcade1Up machine into a MAME/RetroPie cabinet. I made these using a laser cutter; I think that they could also be made on a CNC router without too much difficulty. I don't believe that many people have 3D printers large enough to print these, but if you do, the design could probably be converted to an STL without too much difficulty.
There are three main components included:
Inkscape SVG source files for all parts are included, with components broken out by layer, so you can mix and match design elements or modify them as desired.
The control deck is made up of two sheets of 1/4" (6mm) MDF or plywood stacked on top of each other and glued together. The exact thickness isn't all that important. I generally prefer MDF for this because it has a more consistent surface finish and is less likely to warp. After cutting out the control deck and gluing the layers together, I finished it with gloss black spray paint. I found that I got a much more consistent finish using name brand paint vs. the cheap stuff. The joysticks are attached to the control deck using #6 or M3/M4 screws. The circuit boards for the buttons can be attached to the underside of the control deck using double-sided foam tape.
There are three button styles:
There are two mounting styles:
The front panel is made up of a sheet of 5mm MDF or plywood. In theory, you could probably reuse the stock front panel that comes with the machine, but I don't know for sure if the finish on it is safe to cut with the laser.
The front panel has two speaker size options, each with several grille options. The speakers are mounted to the front panel with M3 or #4 screws.
~77mm (I used ones from my parts box, but they looked like these: https://www.aliexpress.com/item/32882798866.html)
The speakers connect to the LCD controller's built-in amplifier using this cable: https://www.digikey.com/product-detail/en/jst-sales-america-inc/A04KR04KR26E305B/455-3155-ND/. I cut off one end and extended the wires so that they would reach from the LCD controller to the front panel.
The front panel has a mounting location for the LCD controller button board. I had to splice in some additional wire to get the button board wiring to reach all the way to the LCD controller. Having the button board easily accessible is primarily useful for easy adjustment of the speaker volume.
A bezel for the button board is included and should be glued into place as shown in the pictures. (I would suggest cutting the bezel out of 1/8" (3mm) wood). The bezel covers up the pocket for the button board connector. There are also optional reinforcement strips that can be glued onto the back of the front panel. The button board then mounts to the front panel using M3 or #4 screws.
The front panel has cutouts for a power switch, a lighting switch, and USB/audio ports.
Switches: https://www.aliexpress.com/item/4000061576913.html
Front panel dual USB: https://www.aliexpress.com/item/32922583345.html
Front panel USB/audio: https://www.aliexpress.com/item/32954513684.html
I wired the power switch with a 5.5mm male and female barrel connector so that I could put it inline with the stock power supply. The male barrel plug goes directly into the LCD controller. I also tapped off power here for a 12V-5V USB step-down converter to power a Raspberry Pi.
I spliced a female JST-SM connector in line with the power wire to the button lighting, and attached a male connector to the lighting switch. This allows the control deck to be easily separated from the front panel if necessary. Connectors: https://www.aliexpress.com/item/4000054508354.html
My 5mm plywood ended up being slightly thicker than the stock front panel. I had to shave the back of it down near the edges to get it to fit into the slot.
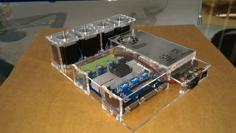
The Arcade1Up machine requires a new LCD controller to convert from HDMI to the LCD's LVDS interface. I used one like this: https://www.aliexpress.com/item/4000095954176.html
I designed a simple mount for this controller. The cut file includes some spacers for both the top and bottom of the main mounting plate, which should be glued on. The LCD controller attaches to the mount with #6 screws, and I attached the mount to the inside of the cabinet using self-adhesive velcro. There is also space on the left side of the mount for a 12V to 5V step down converter to power the Raspberry Pi. It can be attached using cable ties or double-sided tape. https://www.aliexpress.com/item/32811446277.html
| arcade1up-2player-controldeck-24mm-main-bottom-standardscrews.pdf | 3.0KB | |
| arcade1up-2player-controldeck-24mm-main-bottom-thumbscrews.pdf | 3.4KB | |
| arcade1up-2player-controldeck-24mm-main-top-standardscrews.pdf | 19.8KB | |
| arcade1up-2player-controldeck-24mm-main-top-thumbscrews.pdf | 20.1KB | |
| arcade1up-2player-controldeck-28mm-all-bottom-standardscrews.pdf | 3.0KB | |
| arcade1up-2player-controldeck-28mm-all-bottom-thumbscrews.pdf | 3.4KB | |
| arcade1up-2player-controldeck-28mm-all-top-standardscrews.pdf | 19.8KB | |
| arcade1up-2player-controldeck-28mm-all-top-thumbscrews.pdf | 20.1KB | |
| arcade1up-2player-controldeck-28mm-main-bottom-standardscrews.pdf | 3.0KB | |
| arcade1up-2player-controldeck-28mm-main-bottom-thumbscrews.pdf | 3.4KB | |
| arcade1up-2player-controldeck-28mm-main-top-standardscrews.pdf | 19.9KB | |
| arcade1up-2player-controldeck-28mm-main-top-thumbscrews.pdf | 20.1KB | |
| arcade1up-2player-controldeck-rev1.svg | 93.2KB | |
| arcade1up-frontpanel-100mm-speakers-drilled.pdf | 11.4KB | |
| arcade1up-frontpanel-100mm-speakers-meshgrille.pdf | 8.8KB | |
| arcade1up-frontpanel-100mm-speakers-slotted.pdf | 9.7KB | |
| arcade1up-frontpanel-77mm-speakers-drilled.pdf | 11.3KB | |
| arcade1up-frontpanel-77mm-speakers-slotted.pdf | 9.7KB | |
| arcade1up-frontpanel-controlbezel.pdf | 3.1KB | |
| arcade1up-frontpanel-reinforcement.pdf | 1001.0B | |
| arcade1up-frontpanel-rev1.svg | 82.6KB | |
| LCD-Controller-Mount-rev1.svg | 12.8KB | |
| LCD-controller-mount.pdf | 3.0KB |