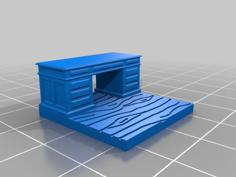
X1C Drawer Base 3D Printer Model
The file 'X1C Drawer Base 3D Printer Model' is (stl,3mf,pdf) file type, size is 3.2MB.
The file 'X1C Drawer Base 3D Printer Model' is (stl,3mf,pdf) file type, size is 3.2MB.
NOTICE
I have printed 3 complete sets of this model for my printers with zero printing issues on the supports for the dovetail overhangs on the walls with them laying flat. There has been 1 report of failing supports on these areas. I would recommend trying to rotate the walls vertically standing up. This will increase the print time for each wall by approximately 3 hours if you use the same settings in the .3mf file. Printing the walls vertically will minimize any post processing on the dovetails.
If rotating vertically fails, or anyone else runs into issues with this please let me know, either in message or leaving a comment. I will modify the dovetail portions to be inset and create an additional part to print to secure the walls and corners together.
Background
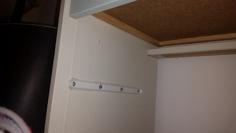
About 2 months ago I found myself in need of a drawer to catch the poop from my X1C's. As you can see from my picture my setup doesn't have any room for the poop shoe I was using with the microwave stands for the AMS's that I have. I found a popular model on Maker World, that others had success with, so printed off that one and it would not fit in the width of my printer. After reaching out to the designer I found he took down his model and was ignoring messages…so I set out to finish the model I had previously been working on from scratch. This model is 100% my own creation and any similarities to someone else's model are coincidental.
Important
The walls do take some post processing to get to fit together correctly. I printed all the walls laying flat, so the dovetail part facing the build plate will have to be taken down with a diamond file so the parts slide together. The walls, corners, and corner brackets are all epoxied together - do a dry fit with printer on top to make sure everything slides together before gluing or epoxying together.
The holes in the Misumi aluminum extrusions let a 3mm screw slide right in, so there's no tapping out the holes - put a generous amount of epoxy on the screws once they are inserted through the sides, then slide the rails on the screws and let set up.
Plates 6 and 7 are the same exact wall, as are plates 5 and 8. The Left Wall Section and Right Wall Section are interchangeable, and really only matter on arrangement if using the optional wall with the button cutout. Alternatively, the optional button wall and optional corner can be used on the other side, just mirror the optional corner if you want the wire for the Bento Box to go out the rear.
Design
The files were done in Sketchup, and were exported in the orientation they are in the model. I just uploaded the PETG print profile I used for this model. I will also put together an assembly guide to assist anyone interested in making one of these.
Print Settings
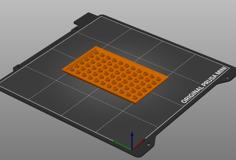
You will have to rotate flat and use supports. I used 5 walls, 3 top and bottom, and 20% grid infill with supports. I printed my parts with Eryone PETG that I bought in bulk for $12/roll if you buy 10 rolls. Please use my friends affiliate link if you can https://eryone3d.com/?ref=fisheye3d, or coupon code “fisheye3d”. The primary color (black) will take a little over 3 rolls, and the secondary color (red) will take a little over 2 rolls. A single base will cost around $120 if you count the optional parts for the Bento Box switch.
Assembly
I have included a very thorough Assembly Guide listed at the bottom of this listing. Please let me know if anything is unclear.
Optional
9 - the right front side wall is where I designed for the button for the Bento Box to go.
10 - use the OPTIONAL corner on the back right for the Bento Box wire to go out the back.
19 - glue or epoxy the back and bottom of the eClips to route the wires (do not glue front part where wire goes.
20 - Bento box fan wires come out the bottom right of the printer, use Wago connectors to connect wires.
There are too many parts with links to list in the additional materials section, so here is everything else:
Full Parts List
30 - 8x2 round magnets - https://www.amazon.com/gp/product/B09YCBGB6W
8 - M3x10 heat inserts - https://www.amazon.com/gp/product/B0B38JNN54
8 - M3x6 heat inserts - https://www.amazon.com/gp/product/B0B38H96H6
8 - M3x8 socket head screws - https://www.amazon.com/Socket-Screws-Metric-Machine-Threaded/dp/B0967ZB5BB
8 - M3x20 socket head screws - https://www.amazon.com/Socket-Screws-Metric-Machine-Threaded/dp/B0967ZK22Q
24 - M3x25+ socket head screws - https://www.amazon.com/Socket-Screws-Metric-Machine-Threaded/dp/B0967ZWJMM
6 - 1020-350 aluminum extrusion - https://us.misumi-ec.com/vona2/detail/110302374340/?HissuCode=HFSFIN5-1020-350
Clear Epoxy - https://www.amazon.com/J-B-Weld-50112-Clear-0-85/dp/B009EU5ZM0
CA glue for magnets
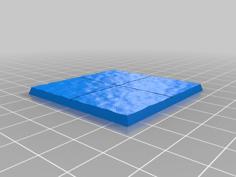
Use a 16x16 mat, or cut down an exercise mat, to sit base on to prevent sliding.
Optional Parts for Bento Box Switch
22ga red/black wire - https://www.amazon.com/gp/product/B0874V6GS4
2 - Wago 2 wire connectors - https://www.amazon.com/Wago-222-412-LEVER-NUTS-Conductor-Connectors/dp/B07CNKLZPQ
1 - 12v toggle button - https://www.amazon.com/Nilight-90013L-Toggle-Control-Warranty/dp/B07T1JG6BD/ref=sr_1_1?crid=1K3ZQ5379J53M
Side Note
I have licensed this model under the Attribution-NonCommercial-ShareAlike 4.0 International license model. This will never change, and will not be taken down by myself, nor uploaded for-profit elsewhere. Please respect this license if you decide to make any changes and republish. I will likely update files and this listing as needed.
Updates
20240623 - Forgot to upload handles in .3mf file.
20240613 - Added notice for printing walls in vertical orientation due to failing supports, additional info for Important on wall order.
20240602 - Added assembly guide; modified description.
20240601 - Added detailed disclaimer to description for clarification.
| 01_-_Rear_Left.stl | 1.1MB | |
| 02_-_Rear_Right.stl | 1.4MB | |
| 03_-_Front_Left.stl | 1.0MB | |
| 04_-_Front_Right.stl | 1.6MB | |
| 05_-_Left_Back.stl | 210.4KB | |
| 06_-_Left_Front.stl | 211.5KB | |
| 07_-_Right_Back.stl | 212.0KB | |
| 08_-_Right_Front.stl | 212.0KB | |
| 09_-_Corner.stl | 215.1KB | |
| 10_-_Left_Drawer_Face.stl | 914.6KB | |
| 11_-_Left_Drawer_Front.stl | 1.2MB | |
| 12_-_Left_Drawer_Rear.stl | 38.1KB | |
| 13_-_Left_Drawer_Handle.stl | 290.0KB | |
| 14_-_RightTop_Drawer_Face.stl | 436.8KB | |
| 15_-_RightTop_Drawer_Front.stl | 608.1KB | |
| 16_-_RightTop_Drawer_Rear.stl | 16.9KB | |
| 17_-_RightTop_Drawer_Handle.stl | 148.3KB | |
| 18_-_RightBottom_Drawer_Face.stl | 432.2KB | |
| 19_-_RightBottom_Drawer_Front.stl | 603.8KB | |
| 20_-_RightBottom_Drawer_Rear.stl | 16.8KB | |
| 21_-_RightBottom_Drawer_Handle.stl | 149.4KB | |
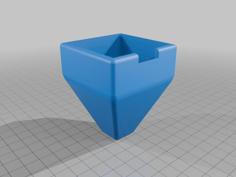
| 22_-_Chute_Top.stl | 526.3KB | |
| 23_-_Chute_Middle.stl | 53.5KB | |
| 24_-_Chute_Bottom.stl | 390.6KB | |
| 25_-_Corner_Bracket.stl | 97.9KB | |
| 26_-_OPTIONAL_Right_Front.stl | 314.9KB | |
| 27_-_OPTIONAL_Right_Back_Corner.stl | 245.8KB | |
| 28_-_OPTIONAL_eClips.stl | 280.0KB | |
| Bambu_X1C_Drawer_Base.3mf | 1.3MB | |
| X1C_Drawer_Base_Instructions_v1.0.pdf | 1.2MB |