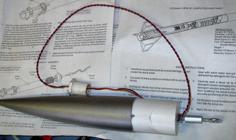
Wire Splice Mold – Slightly Modified 3D Printer Model
The file 'Wire Splice Mold – Slightly Modified 3D Printer Model' is (stl,blend) file type, size is 244.3KB.
The file 'Wire Splice Mold – Slightly Modified 3D Printer Model' is (stl,blend) file type, size is 244.3KB.
Changes from the original:
To use:
Your wires should have a somewhat more water-tight seal now as long as the splice stayed centered.
That is in theory how it should work. I will test after I perform my first print.
Printing:
As this will be encountering hot glue I suggest using a filament that handles heat the best. PLA is probably good enough for the temp of most glue guns, but if you have other filaments that are more heat tolerant use that to be sure. Best I have is PETG so I will use that on my test print (I haven't printed it yet).
Suggestions for future remixes:
| splice_half_A.stl | 89.7KB | |
| splice_half_B.stl | 89.7KB | |
| splice_with_bevels_and_resized.blend | 977.2KB |