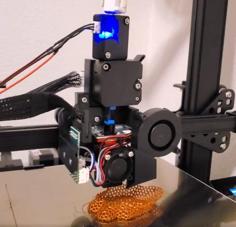
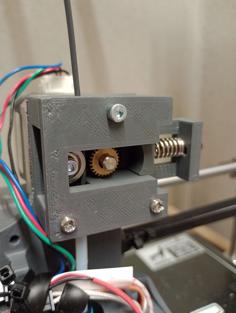
This started because I wanted a clean and simple way to mount my BIQU H2 direct drive extruder that kept the stock blower fan, had the BLTouch close to the nozzle, and was compact. After several tweaks and updates, version 3 has been released. The mount is lighter and more compact without sacrificing strength, the bottom arm has been shortened to give more clearance for fan ducts (only one hole on the bottom is needed since the H2 is secured on 3 sides), the x-carriage now has 4 mounting points, the heater and thermistor wire channel has been improved, and I've made other various tweaks. I've also updated the ADXL343 adapter to match the v3 mount and strengthened the BLTouch and CR Touch mounts.
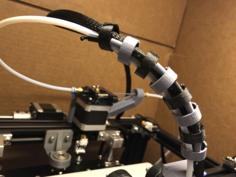
This is a complete kit which also includes a filler plate for the original extruder location and a filament guide and two options for using a cable drag chain, neither of which requires you to unplug wires to install. I highly recommend the R18 version over the 3D printed one as there is less chance of sagging. Also, this mount is compatible with the shorter silicone bed springs for those users still using the factory z endstop.
I've also included a 5015 fan duct. I took Schwab_Manufacturing_Solutions's design and added insane78's channels as well as modified the slots for the fan tabs. I also removed the BX logo and adjusted the edges of the outlet to make it more ASA filament friendly.
The mount was modified to allow more airflow from the heatsink fan exhaust and the holes for the nuts reduced for a more snug fit.
Optional Upgrades
The Claw Fang Duct: https://www.thingiverse.com/thing:5202213.
Cable Chain Bed Mount: https://www.thingiverse.com/thing:5225246
X & Y Linear Rails Kit: https://www.thingiverse.com/thing:5215316
Z Linear Rails Mount: https://www.thingiverse.com/thing:6196091
40mm Fan Adapter (Compact): https://www.thingiverse.com/thing:5245952
40mm Fan Adapter (The Claw Compatible): https://www.thingiverse.com/thing:5250192
More Ender 6 models at https://www.thingiverse.com/vampyrex13/collections/my-ender-6-models.
Updates
• 2022.10.31: Isolator Washer for ADXL chip added.
• 2022.06.20: BLTouch & CR Touch Volcano hotend versions added.
• 2022.06.13: BLTouch & CR Touch v4.
• 2022.03.09: The extruder filler section that sits between the acrylic and the frame is now thinner to account for printer variations.
• 2022.02.10: H2 mount v3, BLTouch & CR Touch v3, ADXL343 v2 and 5015 fan mount v2 update. Bed size increased to 267x247.
• 2022.02.10: ADXL343 adapter added.
• 2022.02.09: Cable chain frame mount wire loom variations added.
• 2022.02.07: Alternate mounts with wire channels added.
• 2022.02.06: Cable chain mount modified for reverse Bowden clearance.
• 2022.01.29: Two cable chain mounts added.
• 2022.01.27: Mount without cable managment added. Merged 5015 fan duct into listing.
• 2022.01.26: ADXL345 moved to sit on top of H2. Cable mangement and lower v-wheel bolt holes tweaked.
• 2022.01.16: H2 mount v2 and BLTouch mount v2 update. CR Touch mount added.
• 2021.12.29: BLTouch mount tweaked. Added extended extruder filler and filament guides.
• 2021.12.21: Factory 4010 fan duct tweaks.
Klipper Firmware Notes
My config below gives you a maximum bed size of 267x247 with ~5mm border on the left edge and ~7mm border on the front edge of the bed with ~1mm clearance between The Claw fang duct and belt. You can increase the bed size to 267x272 with my linear rail kit. If you don't use linear rails, you can increase it to 267x277 by using 3DHSLiad's relocation bracket. Go to https://www.thingiverse.com/make:1007799 to find out more info.
[stepper_x]
position_endstop: 267 # moves x 0 position ~5mm from left edge.
position_max: 267
[stepper_y]
position_endstop: 247 # moves y 0 position ~7mm from front edge.
position_max: 247
[safe_z_home]
home_xy_position: 167.7, 123.5 # ( position_endstop / 2 ) - BLTouch offset
[bltouch]
x_offset: -34.2
y_offset: 0
z_offset: 0 # temporarily reset to 0 to prevent smashing nozzle into bed.
[bed_mesh]
mesh_min: 0, 0
mesh_max: 232.8, 247 # position_max - BLTouch offset
[extruder]
rotation_distance: 3.4334 # the equivalent of 932 e-steps in Marlin.
• ADXL343 owners add the below:
[adxl345]
axes_map: z, -x, -y # remaps axis to account for sideways vertical position.
• ADXL345 owners add the below:
[adxl345]
axes_map: -y, x, z # remaps axis to account for sideways position.
Slicer Notes
• Bed Size: 267, 247.
Versions
• There are four different mounts; the normal version, two chain mount versions, and one without any cable management. The regular chain mount version is compatible with diogosantos88's cable chain links at https://www.thingiverse.com/thing:3715002. I have included the original models in this listing. The R18 chain mount version uses a pre-made R18 10x20mm drag chain. I have added a link to it at the bottom.
• There are two variations of each cable chain frame mount; one that just uses zip ties and one that uses wire loom and zip ties for those that want a cleaner look.
• There are two versions of each probe mount; the regular ones and the Volcano hotened compatible ones which move the probes 8.5mm down.
• There are two filament guides; the regular one and an extended one for use with an inline filament runout sensor like the BTT Smart Filament Sensor or the Creality CR-6 SE optical sensor (pictured above). You can find my case for that sensor at https://www.thingiverse.com/thing:5179620.
• There are two Extruder Fillers; the regular one and an extended one for use with an inline filament runout sensor.
• There are two different fan ducts; the regular one and a 5015 one. If you still have the factory Ender 6 parts fan, use the regular duct. If you've upgraded to a 5015 blower fan, use the two 5015 parts instead.
Hardware
X-Carriage Mount:
• (4) M3x6mm socket cap screws
BIQU H2:
• (3) M3x8mm socket cap screws (top and bottom)
• (1) M3x10mm socket cap screw (rear)
BIQU H2 with ADXL343 adapter:
• (2) M2x6mm socket cap screws
• (2) M2 nuts
• (1) M3x8mm socket cap screws (bottom)
• (1) M3x10mm socket cap screw (rear)
• (2) M3x12mm socket cap screws (top)
BIQU H2 with ADXL345:
• (1) M3x8mm socket cap screws (bottom)
• (3) M3x10mm socket cap screw (top and rear)
R18 Cable Chain:
• (6) M3x8mm socket cap screws
• (6) M3x6mm socket cap screws
4010 Factory Fan Duct:
• (2) M3x6mm socket cap screws
5015 Fan Duct:
• (2) M3x6mm socket cap screws
• (2) M3x20mm socket cap screws
• (4) M3 nuts
BLTouch / CR Touch Mount:
• (2) M3x16mm socket cap screws
BLTouch / CR Touch:
• (2) M3x8mm socket cap screws
• (2) M3 nuts
Extruder Filler:
• PC4-M10 push fitting
Filament Guide:
• (1) M3x10mm socket cap screw
• (1) M3 t-slot nut
Printing Notes
• Print the mount at 40% infill with 5 vertical and horizontal layers in PETG minimum. ASA or ABS is recommend.
• The fan duct should be printed in ASA or ABS since they sit close to the heat block. The other parts can be printed in PETG.
• Print the fan ducts at 0.2 height and use adaptive layers for the best success.
• If using the regular chain mount version, you will need print 31 links.
Installation Notes
• The BIQU H2 mounts on the top, bottom, and rear. Install all 4 screws loosely, starting with the top, then tighten them all.
• If installing an ADXL chip, use the isolater washer to prevent shorting the chip on the H2 body if the coating on the printed circuit board wears away.
• If installing the ADXL343 adaptor, use (2) M3x12mm through the top H2 mounting holes. Make sure you set the axes_map to z, -x, -y in printer.cfg to account for the sideways and vertical orientation.
• If installing an ADXL345 chip, use (2) M3x10mm through the top H2 mounting holes. Make sure you set the axes_map to -y, x, z in printer.cfg to account for the sideways orientation.
• You will to flip the R18 chain ends around when mounting.
• The heater wire should be just long enough with the new wire channel, but if it's too short, it may need to be lengthened or exit the cable chain early before the spray board.
• Replace the two screws holding the hotend fan in place with (2) M3x16mm socket cap screws to attach the BLTouch / CR Touch mount.
• Re-use the stock bolts for the extruder filler.
• Run your reverse Bowden tube through the filament guide to the PC4-M10 push fitting on the extruder filler.
• Secure the wires to the mounts with zip ties.
Parts
Below is my list of parts I used (affiliate links).
Note: The R18 chain I have linked below is long enough for both the x-carraige and bed and it comes with two additional end pieces.
• BIQU H2 v2.0: https://www.amazon.com/dp/B09JWCBKLH/ref=cm_sw_r_as_gl_apa_glt_fabc_T2RD7HYG3VREQKPA30SA?_encoding=UTF8&psc=1&linkCode=ml1&tag=vampyrex13-20
• R18 10x20mm Drag Chain: https://www.amazon.com/dp/B09376Q64H/ref=cm_sw_r_as_gl_apa_glt_fabc_T2RD7HYG3VREQKPA30SA?_encoding=UTF8&psc=1&linkCode=ml1&tag=vampyrex13-20
• 5015 Fan (24V - Creality boards): https://www.amazon.com/dp/B0755BY9RH/ref=cm_sw_r_as_gl_apa_glt_fabc_T2RD7HYG3VREQKPA30SA?_encoding=UTF8&psc=1&linkCode=ml1&tag=vampyrex13-20
• PC4-M10 Push Fitting: https://www.amazon.com/dp/B07ZCNB1L8/ref=cm_sw_r_as_gl_apa_glt_fabc_T2RD7HYG3VREQKPA30SA?_encoding=UTF8&psc=1&linkCode=ml1&tag=vampyrex13-20
Buy Me a Coffee?
Do you like my work? You can buy me a coffee at https://ko-fi.com/vampyrex13.





![[19″] Rack Cable Guide XL 3D Printer Model](https://cdn.3axis.co/assets/ac/bd/3c/6e/acbd3c6e-2739-4e09-8d19-5012420354fa/images/02608790-ad8a-4dcf-8aa5-cc95d7346ff4_thumb.jpg)
