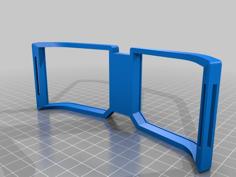
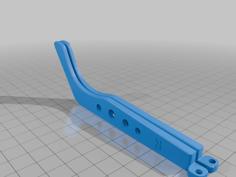
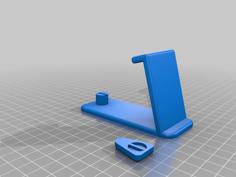
Sistema per il ripristino delle punte dei cacciaviti da orologiaio
Questo sistema è estremamente semplice. Esso è costituito da:
- una base per fermare la pietra per afilare e per ospitare la guida per lo scorrimento del supporto del cacciavite;
- un fermo che, grazie a una vite M3 che agisce su un blocchetto, blocca la pietra nella posizione desisderata (se la pietra fosse fissa
si consumerebbe solo in un punto perdendo velocemente la sua funzionalità); - un supporto, dotato di cuscinetti, per tenere in posizione il cacciavite e permetterne il corretto posizionamento della punta sulla pietra
(da realizzare in metallo con il tornio o da acquistare presso uno dei tanti negozi on-line); - un blocchetto strusciante per riportare in piano la punta del cacciavite.
Pezzi da sampare
1) Base;
2) Fermo;
3) Blocchetto scorrevole per il serraggio della pietra;
4) Blochetto strusciante per spianare la punta.
componenti
n. 4 inserti M2 (Ruthex);
n. 4 inserti M3 (Ruthex);
n. 4 viti M2x12;
n. 1 vite M3x20;
Supporto in metallo con cuscinetti.
1 cilindretto di metallo di diametro = 10 mm e lunghezza = 60 mm;
n. 2 cuscinetti 608RS
n. 2 viti M3x25;
n. 2 viti M3x8;
Pietra per affilatura
almeno n. 4 pietre da affilatura di granna 180, 320, 600 e 1000 e dimensioni dimensioni 150x15x7 mm.
(le pietre da affilatura le ho acquistate on-line).
La realizzazione ed il montaggio di tutte le componenti è banale, comunque viene allegato il file "render.stp" dal quale
si ricavano facilmente le istruzioni di montaggio e di uso.
Istruzioni per la stampa:
materiale utilizzato: PETG
ugello: 0,4 mm
supporti: utili per la base, non necessari per gli altri pezzi.
Allegati:
n. 4 files .stl
n. 1 file .stp
Progetto testato ed in uso da tempo.
System for restoring the tips of watchmaker screwdrivers
This system is extremely simple. It consists of:
- a base to stop the sharpening stone and to house the guide for sliding the screwdriver support;
- a stop that, thanks to an M3 screw that acts on a block, blocks the stone in the desired position (if the stone were fixed
it would wear out only in one point quickly losing its functionality); - a support, equipped with bearings, to hold the screwdriver in place and allow the correct positioning of the tip on the stone
(to be made of metal with the lathe or purchased from one of the many online shops); - a sliding block to bring the tip of the screwdriver back to level.
Pieces to be samped
1) Base;
2) Stop;
3) Sliding block for tightening the stone;
4) Sliding block to flatten the tip.
components
n. 4 M2 inserts (Ruthex);
n. 4 M3 inserts (Ruthex);
n. 4 M2x12 screws;
n. 1 M3x20 screw;
Metal support with bearings.
1 metal cylinder with diameter = 10 mm and length = 60 mm;
n. 2 608RS bearings
n. 2 M3x25 screws;
n. 2 M3x8 screws;
Sharpening stone
at least n. 4 sharpening stones of grit 180, 320, 600 and 1000 and dimensions 150x15x7 mm.
(I purchased the sharpening stones online).
The creation and assembly of all the components is trivial, however the "render.stp" file is attached from which
the assembly and use instructions can be easily obtained.
Printing Instructions: Material Used: PETG Nozzle: 0.4mm Supports: Useful for the base, not needed for the other pieces.
Attachments: n. 4 .stl files n. 1 .stp file Project tested and in use for some time.
System for restoring the tips of watchmaker screwdrivers
This system is extremely simple. It consists of:
- a base to stop the sharpening stone and to house the guide for sliding the screwdriver support;
- a stop that, thanks to an M3 screw that acts on a block, blocks the stone in the desired position (if the stone were fixed it would wear out only in one point, quickly losing its functionality);
- a support, equipped with bearings, to hold the screwdriver in place and allow the correct positioning of the tip on the stone (to be made of metal with the lathe or purchased from one of the many online shops);
- a sliding block to bring the tip of the screwdriver back to level.
Pieces to be samped:
1) Base;
2) Stop,
3) Sliding block for tightening the stone;
4) Sliding block to flatten the tip.
components:
n. 4 M2 inserts (Ruthex);
n. 1 M3 insert (Ruthex);
n. 4 M2x12 screws;
n. 1 M3x16 screw;
Metal support with bearings:
1 metal cylinder with diameter = 10 mm and length = 60 mm;
n. 2 608RS bearings n. 1 M3x6 screw;
n. 2 M3x25 screws;
Sharpening stone at least n. 4 sharpening stones of grit 180, 320, 600 and 1000 and dimensions 150x15x6.8 mm.
(I purchased the sharpening stones online).
The creation and assembly of all the components is trivial, however the "render.stp" file is attached from which the assembly instructions can be easily obtained.
Printing instructions:
material used = PETG
nozzle: 0.4 mm
supports = not required
Attachments:
n. 4 .stl files
n. 1 .stp file
Project tested and in use for a long time.
Come si usa
spianatura della punta
1) Inserire il cacciavite nell'apposito supporto in PETG senza stringerlo, ci sono tre fori diversi da utilizzare sulla base del diametro della punta;
2) Inserire il supporto in PETG all'interno dei binari della base;
3) tenendo fermo il supporto premere il cacciavite fino a quando la punta va a toccare la pietra;
4) estrarre il supporto e pemere sul cacciavite facendo fuoriuscire la punta di ulteriori 1 - 3 decimi di millometro;
5) bloccare il cacciavite stringendo l'apposita vite;
6) reinseire il supporto in PETG nei binari della base e muoverlo in senso alternato senza fare eccessiva pressione;
7) continuare lo strusciamento fino a quando la punta non risulta in piano.
nota: se la punta è troppo sciupata conviene sostituirla.
affilatura della punta
1) Inserire il cacciavite nell'apposito supporto in metallo senza bloccarlo;
2) Inserire il supporto in metallo all'interno dei binari della base e far scorrere il cacciavite fino a quando la superficie della punta diviene perfettamente parallela con la superficie della pietra (angolo di taglio);
3) bloccare prima la vite superiore del suporto e poi le due viti laterali;
4) togliere la vite superiore e far scorrere la punta sulla pietra nei due sensi esercitando una lieve pressione;
5) ribaltare il supporto in metallo e ripetere l'operazione per l'altra faccia della punta.
nota: è molto importante rispettare l'angolo di taglio della punta e per effettuare un'affilatura impeccabile è utile bagnare la pietra con poca acqua.
How to use
tip flattening
1) Insert the screwdriver into the appropriate PETG support without tightening it, there are three different holes to use based on the diameter of the tip;
2) Insert the PETG support into the base rails;
3) holding the support still, press the screwdriver until the tip touches the stone;
4) extract the support and press on the screwdriver, making the tip come out by a further 1 - 3 tenths of a millimetre;
5) lock the screwdriver by tightening the appropriate screw;
6) reinsert the PETG support into the base rails and move it in an alternating direction without applying excessive pressure;
7) continue rubbing until the tip is flat.
note: if the tip is too worn, it is best to replace it.
tip sharpening
1) Insert the screwdriver into the appropriate metal support without tightening it;
2) Insert the metal support into the base rails and slide the screwdriver until the surface of the tip becomes perfectly parallel with the surface of the stone (cutting angle);
3) first lock the upper screw of the support and then the two side screws;
4) remove the upper screw and slide the tip on the stone in both directions, applying light pressure;
5) flip the metal support over and repeat the operation for the other side of the tip.
note: it is very important to respect the cutting angle of the tip and to obtain impeccable sharpening it is useful to wet the stone with a little water.