I wanted to start my knurling and thread cuts at exactly the same place. Here is a simple, fast, non-destructive and easy way to use
an inexpensive digital caliper from Harbor Freight (20$)
to make a functional (x axis) DRO (Digital Read Out)
for a Variable speed Central Machinery 7x10 mini lathe,
in under 3 minutes, without modding anything (except possibly this very long sentence).
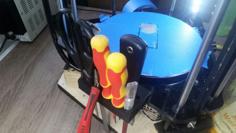
By the way the third file is just an Allen wrench holder and shows how this design can be "derivatized". Feel free to change this design. Maybe to have a 45 degree angled surface.
Have fun.
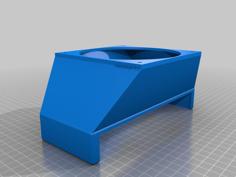
Principle of Design: Pinch the caliper body between the two parts and tighten in place using the two 1/4 20 bolts (don't drill any holes in your lathe!). "Capture" the head of the caliper with the two rare earth magnets mounted on the side of the cross feed. Procedure:
Drill the marked holes in the two 3D printed parts with a #7 drill (cradle and support) and Tap the holes with 1/4 20 TPI threads.
Move the head toward the caliper until the magnets capture it.
It's possible zero to 0.00 mm in about 10-20 seconds.
Good references:
Here are two other designs (but for bore hole drilling):
https://www.thingiverse.com/thing:17970 http://www.thingiverse.com/thing:938237 See below: Here is a BRILLIANT hack that I found on youtube using Rare earth (Neodynium) magnets on a bigger 7x12 lathe. You can get a bucket of these magnets online or just cannibalize some old LED "thowees".
https://www.youtube.com/watch?v=riHF9NG9GNo Harbor freight digital calipers: 20$
http://www.harborfreight.com/6-in-digital-caliper-61585.html
Project Parameters --------- Platform: Up!3D Resolution: 200 u, Normal resolution, 95% fill Material: ABS CAD:TrueSpace 7.61 - Central machinery 7x10 mini lathe - #7 drill - 1/4 20 TPI Tap Art-to-Part time: 30 minutes Design notes: This really works beautifully. Printing Tips: de-Rafting was also easy. ------- N/A ------------ CAM: N/A DeskProto CNC: N/A FlashCut Laser: N/A Venus | DRO13.stl | 7.7KB | |
| DRO15.stl | 8.3KB | |
| DRO16.stl | 19.4KB |