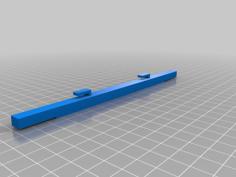
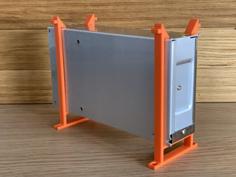
This print is designed to mount a Fosi BT30D Pro amplifier and its power brick inside a pinball machine's metal backbox (e.g. Stern Spike2) with 6 to 12 30mm x 10mm x 5mm rare-earth magnets. The 6 side magnets concealed by the side locks should be sufficient to hold the amp in the backbox by themselves, but there are slots along the top edge where up to 6 more magnets may be added to increase hold in cases when the pin will be moved.
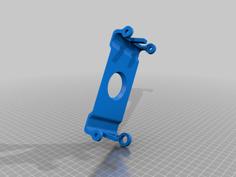
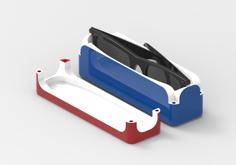
There are 5 components to the print. 1x Mount, 2x Straps, and 2x Side Locks. Follow the notes in the print settings section for best results.
Disclaimer: Print and use at your own risk. Read ahead an understand what you are doing before proceeding. Evaluate the risk and test the design before installing. Use your best judgement as to whether this mount is appropriate for your environment and situation. You assume all responsibility for damage to yourself, your pin, or anything else when you print, assemble, or use this mount in any way. This design was tailored to one sample amp and power brick. Tolerances are tight to prevent rattling, so it's possible that other examples of the same amp or a factory change of power brick may lead the amp or power brick to rattle in the mount or not fit at all.
Amp: https://a.co/d/gqxzHZC
Magnets: https://a.co/d/8RepSuG
Assembly:
- Place the amp in the base mount. The amp only fits one way.
- Place the power brick in the base mount. Orient so the power input (wall power) is on the same side as the amp controls.
- Snap the two straps over the amp and power brick. The straps only fit one way. Make sure the middle is snapped into the base mount as well as both sides.
- Place 3 magnets along one side. Be careful with this step and read the warnings that come with the magnets. If they are allowed to snap together, they can break or hurt you. You will need to hold (or tape) each down until you snap on a side lock in the next step. TIP Alternate the polarity of adjacent magnets to increase their hold. The magnet should prefer this orientation to another. Let the magnet tell you which is correct.
- Snap a side lock in place over the magnets. First hook the long single-tab over the edge of the base mount. Then push the double-tabbed side down into the strap slots to lock them in place. This may require some force. Do not do this until you have the straps and magnets in place as it will be tough to undo.
- Repeat steps 4 and 5 on the other side. Do not place magnets along the top edge, yet.
- The magnetic pull is fairly strong, so be careful and go slow when mounting in the backbox. Place the mount so that the amp controls face down and will be accessible through the access panel without removing the backglass.
- After mounting, it's possible to slide the mount with some force to relocate its position. Additional magnets may be added along the top edge of the mount to help prevent additional movement if needed. Use your best judgement here, especially for pins that may be moved or transported with the mount in place.