English:
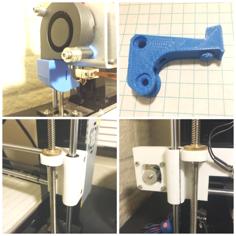
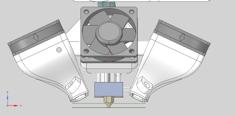
I have modified the Y axis of the chiron with two linear guide.
You can print on the Y axis up to 100mm/s with acceleration 3000 without problems.
By removing a lot of weight the quality of printing on this axis can be increased considerably.
Files to print:
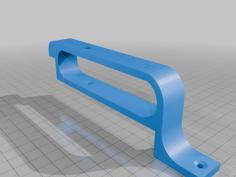
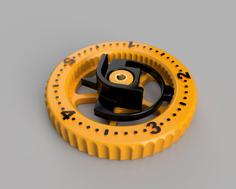
1 x Guide_eje_linear_china_40-20.STL
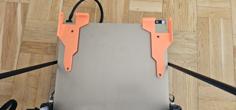
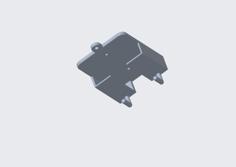
2 x MGN12H_V2.STL
2 x MGN12H_V2_mirror.STL
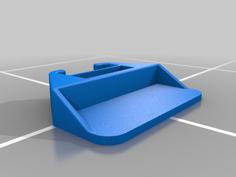
2 x LiftCorreaCama.STL
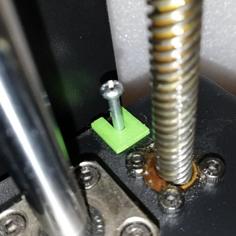
1 x Chiron-Z-endstop(reflejada).stl (optional)
Instructions:
Remove the bed by removing the wheels and store them.
Disassemble the belt and store the screws.
Mount the guides on the top and inside of the profiles.
Use the clamp to center the linear guide.
Once the guide is centered. Use a cutter to remove the decorative plastic. Remove the excess part of the plastic.
Center the guides well with the clamp and tighten well using the tnuts and M3 screws.
Assemble the 4 pieces MGN12H_V2.STL on the blocks MGN12H.
Mount 2 LiftCorreaCama.STL to lower the belts and screw it.
In case you need it, print Chiron-Z-endstopreflejada.stl to modify the height of the Z-axis endstop
And enjoy it!
Materials:
Tnuts M3 http://s.click.aliexpress.com/e/_skSvOX
8 Screws M4 30mm http://s.click.aliexpress.com/e/b2HwtZOC
4 Screws M5 10mm http://s.click.aliexpress.com/e/b2HwtZOC
Screws M3-A2 http://s.click.aliexpress.com/e/WLDwXVQ
And one of these two options:
-Original HIWIN (More expensive, excellent quality)
2 linear guide 600mm. Model MGN12H https://s.click.aliexpress.com/e/_AkSImJ
2 Blocks MGN12H https://s.click.aliexpress.com/e/_A0zWl9
OR
-Clone HIWIN (cheaper, worse quality)
2 linear guide 600mm. Model MGN12H http://s.click.aliexpress.com/e/cWxlReay
2 Blocks MGN12H http://s.click.aliexpress.com/e/cWxlReay
Español:
He modificado el eje Y de la chiron con dos guías lineales.
Se puede imprimir en el eje Y hasta 100mm/s con aceleración 3000 sin problemas (Posiblemente más).
Al quitar mucho peso se puede aumentar considerablemente la calidad de la impresión en este eje.
Archivos a imprimir:
1 x Guía_eje_linear_china_40-20.STL
2 x MGN12H_V2.STL
2 x MGN12H_V2_mirror.STL
2 x ElevadorCorreaCama.STL
1 x Chiron-Z-endstop(reflejada).stl (opcional)
Instrucciones:
Retire la cama quitando las ruedas y guárdelas.
Desmonte la correa y guarde los tornillos.
Monte las guías en la parte superior e interior de los perfiles.
Utilice la pinza para centrar la guía lineal.
Una vez centrada la guía. Utilice un cutter o similar para quitar el plástico decorativo. Retire la parte sobrante del plástico.
Centre las guías bien con la pinza y apriete bien usando los tnuts y los tornillos M3.
Montar las 4 piezas MGN12H_V2.STL sobre los bloques MGN12H.
Ponga 2 LiftCorreaCama.STL para bajar las correas y atornillarlo.
En caso de que lo necesite imprima Chiron-Z-endstop(reflejada).stl para modificar la altura del endstop del eje Z
Y a disfrutar!
Materiales:
Tnuts M3 http://s.click.aliexpress.com/e/_skSvOX
8 Tornillos M4 30mm http://s.click.aliexpress.com/e/b2HwtZOC
4 Tornillos M5 10mm http://s.click.aliexpress.com/e/b2HwtZOC
Tornillos M3-A2 http://s.click.aliexpress.com/e/WLDwXVQ
Y una de estas dos opciones:
-Original HIWIN (Más caro, calidad excelente)
2 guía linear 600mm. Modelo MGN12H https://s.click.aliexpress.com/e/_AkSImJ
2 bloques extra MGN12H https://s.click.aliexpress.com/e/_A0zWl9
O
-Clon HIWIN (más barato,peor calidad)
2 guía linear 600mm. Modelo MGN12H http://s.click.aliexpress.com/e/cWxlReay
2 bloques extra MGN12H http://s.click.aliexpress.com/e/cWxlReay
Más info en el canal de telegram https://t.me/Fundidores3D
| Chiron-Z-endstopreflejada.stl | 193.8KB | |
| ElevadorCorreaCama.STL | 29.6KB | |
| Guía_eje_linear_china_40-20.STL | 43.4KB | |
| MGN12H_V2.STL | 88.0KB | |
| MGN12H_V2_mirror.STL | 94.1KB |