So does your Pullip / Doll like to take a nose dive and take her stand with her?.
NOTE: Also added a little Pullip stand that uses 1 washer for weight, and a post with holes in so you can put cotton through it matching the clothes there wearing and tie them to the post, why not. Also could stick a 10mm round magnet at the top and one down the back of there clothes.
NOTE: A Pullip doll is 220gm and up depending on hair and clothes, so a basic clothed one and short hair 220 gram. There normal stand weight is 44 or 55 gram. This one here has a base with 220 grams of washers in it. Would be %50 heavier with lead or use less lead to half fill it.
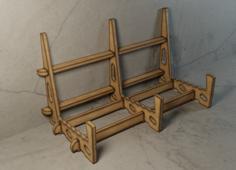
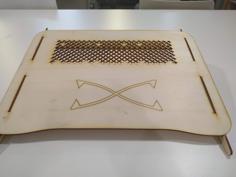
So here is how my large Magnetic and Stumpy stand are made. Stumpy will take a standard bit of wire from an existing stand know at my house as mr grabby grabby. You can also buy 0.5mm to 1mm thick stainless wire from Ebay etc and bend to suit and make your own grabby bits. Don't buy 2mm you will never bend it to suit. And get stainless as it will not stain clothes or rust. Ebay is about $3 for 10 meters of 0.5mm. Now the stands are 12mm thick on the base, so are higher than normal Pullip bases, not really an issue. Paint the various color to suit?
There lasercut from 3mm (1/8inch) thick ply or other wood. Find a friend with a laser and have them cut them. If you were to get them cut and pay then I suspect they might be about $3AU each for the cutting time and $1 for the timber. Since I have my own laser and I am buying the washers in bulk 1000 at a time my total cost per stand is costing me about $2.20 AU painted finished stand. Covered in felt?? no idea, but not a lot more. Magnets for the magnetic stand cost about 20c each by the 200 pack. And you can use as little as 3 or as many as 10 per stand.
I paint them or cover them in felt. I also add a felt or non slip bit to the bottom. Also a non slip top bit is handy. Easy to cut on the laser. So very few dolls and stands fall over now if I open the window behind them and the breeze comes in.
So what's in them to weigh them down??? well those large square washers shown in the stand weights pictures and the stands being glued. The main weight is 8 of these (M10 x 38mm x 38mm x 3mm Zinc Yellow Heavy Square Washers Low Tensile HEC Standard) they come in galvanised as well but plain are fine and cheaper. They range from $1AU for 1 down to 18c each for 1000. So you can fill them with other things but steel washers like this or lead is best. People in countries where you can buy lead or steel shot used for reloading shot shells could use them, pour them in and add some glue to stick them all together. I could have also used lead sheet, but it costs more and needs to be cut to size, not hard but the washers are easier and less mucking around for me. Sand would work but does not add much weight, putty / clay would be better.
Posts.
The posts are made by gluing together the 3 bits. Various ways to do this. I like to wipe a small amount over the area then stick together and hold with pegs. With the magnetic stands I like to add the washers at the same time as gluing the bits together, and wood work PVA glue is fine for theses as well. With the post designed to hold a wire grabber I use the bit that was cut out by the laser from the gap, in other words the scrap bit. I wet that then slide it down the slot to push any excess glue down to the bottom of the slot, then pull it out and leave the post to dry. Posts may be a little loose or to tight depending on the thickness of the stock and how thick the glue is between the 3 pieces glued together to make the post’s. If it is too loose I slip a sliver of thin card down the side when gluing then cut the bit’s sticking out off. Too tight? just sand the end of the post a little. To get the post vertical as there is often some movement, I place it on a bench then line it up against the side of a window or door etc by eye site, move to suit then let dry.
Magnetic.
Now I use 10x20mm neodymium magnets mainly for these ones and on the stands I glue in steel washers 2 deep so 8 to a stand, there pretty cheap by the 1000. (5/32" x 5/8" x 16g (M4 x 16mm x 1.6mm) Zinc Mudguard Fender Washers Low Tensile HEC Standard) 1000 for $36AU so 3.6c each and 40c a stand. Now you could only use 4 at the top, still works fine. I use 2 deep then I end up using less magnets as 2 deep tend to fill the 3mm gap. Now there is 4 at the top which allows for shorter dolls or different location of the magnet. And if your thinking lets stick magnets on the post might work better?, yeah will grip better however the magnets want to a line over each other so adjusting the doll position on the post is harder, not worth the annoyance. The lower 2 washers, not used much but added them just to allow a dress to be stuck to the stand down there as an extra holding point. Not sure if it is worth doing but that cut out can be eliminated b4 lasering it.
Whacking the doll on the stand.
Now I just slide 2 magnets down the back of a dolls dress between her shoulders and then place 2 or 3 on the outside then make sure the doll is standing up then plop her up against the stand and that's it. You can slide her down a bit and have her legs bend at the knee etc if you want. Will not work on all Pullips and other dolls but will work on a lot, so they then display without a gripper around the waist, and if they slip on the stand they generally just hang there rather than fall onto the floor. Some original stock is too tight to slip even 1 magnet down there back. So back to using a gripper stand.
| Little_Pullip_Stand__19-09-2024.ai | 15.3KB | |
| Pullip_Stand_19-09-2024.ai | 14.8KB |