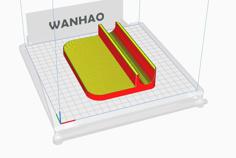
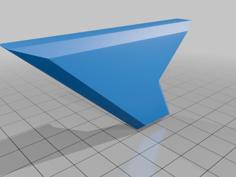
Custom designed and 3D printed "Winglets."
These are basically extensions for the regular footpads (back and front) of the original Floatwheel.
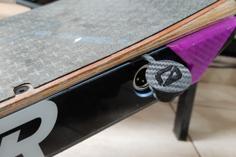
You can add them to your board without modifying the board itself, but you will need an interface plate (cut from 1.5mm aluminium) where the WINGLETS will be attached to (2 screws per Winglet).
They allow much more space for the feet to move around in rough terrain, more concave on the outside, and significantly better leverage for turning to make it more responsive.
Overall, they provide much more stability when the tire’s sidewall hits some chunk because the feet can automatically/intuitively counter the impulse.
They also help protect the board because these are what hit the ground. If one gets damaged (which hardly ever happens), I just have to replace a single "Winglet," while the footpads and rails stay intact.
Print them in PA12-CF
(5 outer walls, 5 upper and lower layers, 25% infill, orientation so that the groove for the interface plate faces the top; support needed only on the plate; 20mm brim recommended)
There is also a (quick and dirty) file for the interface plate attached which can be printed and then used as a TEMPLATE to cut out the mandatory interface plate (1.5mm aluminum).
This goes between the footpad and the rails, allowing the "Winglets" to attach without the need to modify the footpads or the board itself (since the "Winglets" are just attached to that interface plate).
Mounting Instructions:
At first mount the interface plate below the footpads, WITHOUT drilling the holes for the winglets. Once the board is fully assembled (including interface plate), attach the winglets and make sure they fit perfectly.
Then add the screws until they slightly "puncture" the interface plate and remove the screws and the winglets again. Then drill a 4mm whole for each screw.
Finally attach the winglets with the screws (tight fit). This makes sure that the winglets get the best fit possible, which is absolutely crucial for them to hold well.
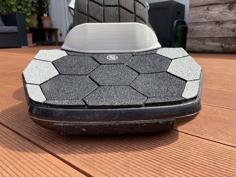
Finally add some Ignite Hexagon Foam grip tape (4mm).
NOTE: If you add "Winglets" to the sensor side (front footpad), make sure to also put a little 1.5mm thick aluminium "washer" below the sensor "connector" on the footpad (because since the foodpad is RAISED by 1.5mm with the interface plate, you of course need to LOWER the sensor "connector" to be sure that you keep the original fit).
Attached you also find a slightly modifed (Quick and Dirty) version of "Hyperforma"´s mud guards (which I print in ASA) extended version. I modified them to get even more tire clearance and to match the different height of the footpads (caused by the 1.5mm interface plate).
You can also find the mini fenders from the pictures uploaded by me as a different "thing".
| FW_ADV_Footpad_PLATE_INSERT_v02.stl | 461.3KB | |
| FW_Winglet_v10_Final.stl | 171.7KB | |
| Hyperforma_MudGuard_Customized_WINGLET_Version_v04_RC2.stl | 1.1MB |