This is a very basic camera lucida, an optical drawing tool used by artists to assist when sketching a picture.
Background
I was intrigued when I first saw the neoLucida and thought that it would be something I'd like to try - until I saw the price... a bit much when I wasn't sure that I'd like using it.
I had done some looking around and found a couple of interesting designs on Printables: the first one by Chris Borge looked splendid, until I realised that the base and lid were too long for either of my printers; the second one, also by Chris Borge, was far simpler to print but I didn't have a suitable old lamp base. Because of these problems I blatantly pinched a few ideas from both and added my own ideas!
The head unit is almost identical to the simple camera lucida, and the use of the telescopic arm was taken from from the more complex device.
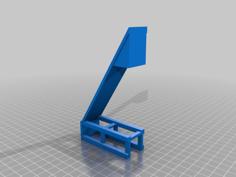
The head unit
This is a simple print with no significant issues. I used a piece of 2mm picture-frame glass of 50mm x 70mm for the diagonal, and a 3mm acrylic mirror of 50mm x 50mm (from eBay) for the back reflector. You may need to use a very small file or folded sandpaper to smooth the slots so that the glass and mirror slide in easily. Get it so that you don't have to force the glass and mirror into place (especially the glass) as there is a risk that it may break and cause injury - take your time and get the fit right. A spot of glue in the corners of the glass and mirror will hold them in place, if required - I didn't need to do this though.
Ideally the diagonal should be semi-silvered and the mirror should be surface coated, but those are hard to find and very expensive. This is meant to be an inexpensive device!
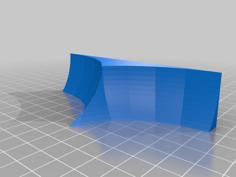
The base unit
This is a very easy print designed for either clamping to a surface, or for screwing down to a piece of wood.
Link mounts
One of these is glued into the recess in the back of the head and base units, after inserting a standard M6 nut in the appropriate place. I used CA glue to fix mine.
Top and bottom links
These are designed to be be glued to each end of the telescopic arm - see Chris Borge's design for a description of the arm (I got mine on eBay). I have also included a couple of test pieces that have the hole diameters I used in the links so that you can test whether they will fit the arm before printing the proper items. Note that I pulled the 'scratching comb' out of the end of the arm, leaving the sleeve attached - the top link is sized accordingly.
Important! Extend the arm fully before gluing on the bottom link as it is very easy to get glue on the second-largest tube and it will never extend again (don't ask how I found this out...).
If you can't get the telescopic arm you can use a length of 10mm diameter aluminium tube or similar round rod/tube and glue a 'bottom link' at each end. This will work just as well, but the height won't be adjustable.
Fixing screw knobs
Any appropriate knob that uses a M6 machine screw or bolt would work here, as long as the screw is the correct length - it must locate on the nut inside the head and base nuts without going right through and colliding with the surface behind. The easiest way to make sure is to try it out before gluing the mounts on; you should see that the thread is fully engaged without protruding past the surface of the nut.
I used this star knob design by 'Mobyflavour', combined with a 30mm hex-head bolt, and a pair of these work very well on my unit with an M6 washer underneath.
The OpenSCAD code
No non-standard libraries are required to compile this code. Simply uncomment the part you want to create near the top of the file and generate the STL file in the usual way.
| base.stl | 368.1KB | |
| bottomLink.stl | 357.3KB | |
| camera_lucida.scad | 3.6KB | |
| head.stl | 267.1KB | |
| holeTest_bottom.stl | 10.6KB | |
| holeTest_top.stl | 10.6KB | |
| mount.stl | 30.6KB | |
| topLink.stl | 357.3KB |