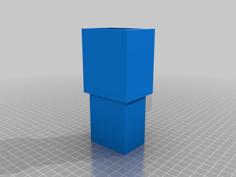
Auto Focus Laser Mod For Galvo Fiber Laser Engraver 3D Printer Model
The file 'Auto Focus Laser Mod For Galvo Fiber Laser Engraver 3D Printer Model' is (stl) file type, size is 126.0KB.
The file 'Auto Focus Laser Mod For Galvo Fiber Laser Engraver 3D Printer Model' is (stl) file type, size is 126.0KB.
Before starting this upgrade, I HIGHLY recommend heading over to Alibaba and visiting the company that I purchased my fiber laser from. The link is https://x.alibaba.com/AvS7Au?ck=minisite . ASK for alice and please tell her Jeremy Miller sent you. I paid under half of what my raycus 50 watt would cost in the u.s., and i was able to get the 2d workbench, and the foot pedal, and 2 sets of lenses and STILL remain half the price of a unit without the extras in the usa. Alice was super helpful and very smart. Of course, if you visit and purchase from them and mention it was me who sent you, i will receive free lenses and stuff, but it truly is worth visiting them. Anyways, now on to the description of my item here.
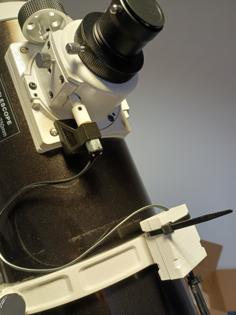
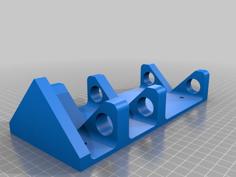
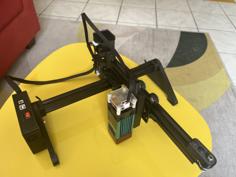
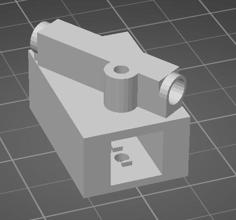
I recently performed an upgrade to my fiber laser to improve the speeds of adjusting my focal height using 2 diode lasers that meet when the height is properly obtained. On a more expensive unit, this is normally included, but on mine it was not. What I have made here is a piece that can be 3d printed, and then a couple of diode lasers can be installed in the unit, and the entire setup goes on the machine next to the lens, by simply removing the existing screws on the machine and replacing them after installation. You may or may not need to do some shimming with a thin piece of paper behind one of the diode holders as you tighten down on the screws to fine tune the setup, but it should pretty much fall dead on without it. I don't quite know the name of the bolts and nuts I used because I found them in a scrap bin here at the job, but I am including measurements of them so you can find them. The link to the diodes that you will need is as follows:
I printed this with 20% infill, and used a skirt around the print, and used supports touching buildplate only, and I had zero issues with the printing. You might need to use a drill to make the diodes actually fit in the holders I have created, but I like making my stuff really tight like that so that it doesn't require any type of adhesive or anything like that. You are also going to need to know how to solder if you use the door bell wire like I used in my setup, but I am sure you can find other wire to do it differently if you are not comfortable. You will also need a standard wall brick that puts out 5v dc to power the diodes.
Instructions:
Order diodes from amazon
Order small wire such as door bell wire (won't need much)
Print the design
Insert diodes into the holders, routing the wires out of the tiny holes that are in the mounts for future soldering.
Insert the bolts and "nuts" into the assembly to hold the diode mounts to the assembly.
Solder the positives of each diode to the positive of the power source, and solder the negatives to the negative.
Remove the three screws on the galvo fiber laser directly in front of the lens and place
the assembly where the screws were removed from.
Re insert the factory screws and tighten.
Plug in the diodes.
Set your galvo to the proper focal height of something easy to see the diodes.
Adjust so the beams are on top of one another.
Optional: Once the beams touch, some super glue may be applied to make sure it all stays in place.
Enjoy your new laser height adjustment upgrade!! PLEASE feel free to make improvements on my print in any way, shape, or form.
| new_laser_diode_holder_design2.stl | 449.3KB |